

I’ve been driving for what feels like an eternity, and in that time, I’ve had my fair share of chipped and cracked windshields. It’s an inevitable part of car ownership, a rite of passage for motorists. Each time that tiny starburst or creeping line appears, a familiar wave of dread washes over me, followed swiftly by the practical question: “How much is this going to cost me?” This constant cycle has made me something of an accidental expert on windshield repair prices, and I want to share what I’ve learned to help others navigate this often-confusing landscape.
Understanding the Variables That Drive Windshield Repair Costs
When I first faced a ding on my windshield, I naively assumed there was a fixed price for repairs. Oh, how wrong I was! I quickly discovered that numerous factors play into the final cost, much like buying a new pair of shoes – it’s not just about the size; it’s about the brand, the material, and where you buy them. It’s a complex equation, and understanding these variables is the first step in managing your expectations and your budget.
The Type and Severity of Damage
This is, perhaps, the most obvious influencer. A small, simple chip is a world away from a long, spiderweb crack. I’ve had both, and the difference in repair time and cost was stark.
Chips vs. Cracks
I’ve learned that chips, especially those smaller than a quarter, are generally quick and inexpensive to fix. They often involve injecting a resin into the damaged area to prevent further spreading and restore optical clarity. Cracks, however, are a different beast entirely. The general rule of thumb I’ve been told is that if a crack is longer than a credit card, it’s often beyond repair and necessitates a full windshield replacement. Even shorter cracks can be more complex to fix than chips, requiring more resin and a more meticulous application process.
Size and Location of the Damage
The bigger the chip or the longer the crack, the more material and time are needed for the repair, and naturally, the higher the cost. Furthermore, the location matters significantly. A chip smack in my line of sight is treated with more urgency and care than one near the edge of the windshield, where it might be less visible but still structurally problematic. Some technicians I’ve spoken with are hesitant to repair damage too close to the edge because it compromises the structural integrity of the glass more significantly.
Your Vehicle’s Make and Model
I’ve owned a variety of cars over the years, from a sturdy old sedan to a more modern SUV with advanced safety features, and I can tell you firsthand that the vehicle itself plays a huge role in repair costs.
Standard Windshields vs. Advanced Windshields
My older car had a fairly standard windshield, and repairs were straightforward. My newer SUV, however, boasts features like rain sensors, automated emergency braking cameras, and heating elements embedded within the glass. These “advanced driver-assistance systems” (ADAS) make windshields much more sophisticated, and consequently, more expensive to repair or replace. A simple chip near an ADAS sensor might not be so simple after all; the sensor often needs to be recalibrated after any significant work on the windshield, adding to the overall cost. I learned this the hard way when a tiny chip near my rain sensor spiraled into a more involved and costly repair than I anticipated.
Vehicle Age and Rarity
I’ve found that older or rarer cars sometimes have higher repair costs simply because the glass might be harder to source. If a specific windshield isn’t readily available, the mechanic might have to order it, which can increase both the price and the waiting time. Conversely, for common models, parts are plentiful, which can keep costs lower.
The Repair Shop You Choose
This is a variable that I’ve learned to control through careful research. Not all repair shops are created equal, and their pricing structures can vary considerably.
Independent Shops vs. Dealerships vs. National Chains
I’ve explored all three. Dealerships, while offering brand-specific expertise, very often come with a premium price tag. Their overhead is generally higher, and they use OEM (Original Equipment Manufacturer) parts, which are often more expensive than aftermarket options. Independent shops are a mixed bag; some are fantastic and offer competitive pricing, while others might be less reputable. I always recommend checking reviews and asking for quotes. National chains like Safelite are often my go-to for convenience and their often-standardized pricing, but even they can have regional price differences. My advice is always to get at least two or three quotes before committing.
Technician Expertise and Equipment
I’ve learned that a skilled technician using high-quality resin and equipment can make a significant difference in the longevity and appearance of a repair. While I might be tempted by a cheaper quote, I always consider the reputation of the shop and the experience of the technician. A poorly done repair can lead to a crack spreading, ultimately costing me more in the long run.
The Average Price Ranges I’ve Encountered
Based on my experiences, I can offer some general price ranges, but it’s crucial to remember these are approximations. Prices can fluctuate wildly based on all the factors I’ve just discussed, as well as geographic location.
Small Chip Repair (Under 1 inch)
These are usually the most affordable repairs. I’ve typically paid $50 to $100 for a single chip. If I have multiple small chips, some shops offer a slight discount for subsequent repairs on the same visit. For instance, they might charge full price for the first chip and then a reduced fee for additional chips. I’ve found this to be a nice perk when those pesky little rocks seem to be targeting my windshield relentlessly.
Medium Chip or Short Crack Repair (1-6 inches)
As the damage becomes more significant, so does the cost. For chips larger than an inch or cracks up to roughly six inches (the size of a credit card), I’ve seen prices range from $75 to $150. This range often reflects the increased time and resin required, as well as the technician’s skill in handling a more complex repair. I’ve always prioritized getting these fixed quickly; a small crack has an uncanny ability to spread rapidly, especially with temperature changes.
Windshield Replacement Costs (If Repair is Not Possible)
This is the scenario I always hope to avoid, as it’s significantly more expensive. When I’ve had to replace a windshield, the costs have varied dramatically.
Standard Windshield Replacement
For a standard, unheated windshield without ADAS features, I’ve typically seen replacement costs ranging from $200 to $400. This often includes the cost of the glass itself, labor, and adhesive. The good news is that for common vehicles, aftermarket glass can help keep these costs down.
Advanced Windshield Replacement (ADAS, Heated, etc.)
This is where the price jump becomes substantial. For my SUV with all its fancy features, a replacement could easily run me anywhere from $500 to $1,000+. The higher end of this range is usually for luxury vehicles or those with a full suite of ADAS features requiring precise recalibration. I’ve learned that recalibration can be a significant portion of the replacement cost, sometimes adding hundreds of dollars.
Insurance Coverage and Deductibles
This is often the saving grace when facing windshield damage, and it’s something I always check the moment I see a problem. My insurance policy has been a lifesaver more than once.
Comprehensive Coverage
I’ve always made sure my auto insurance includes comprehensive coverage, because this is what typically covers windshield damage. Without it, I’d be footing the entire bill myself, which can be quite hefty for a replacement. It’s definitely worth the slightly higher premium, in my opinion, given how common windshield damage is.
Deductibles and “Full Glass Coverage”
Most comprehensive policies come with a deductible. If my deductible is $500 and a repair costs $100, I’ll pay the $100 out of pocket. If a replacement costs $700, I’ll pay my $500 deductible, and the insurance company will cover the remaining $200.
However, I’ve found that some insurance policies offer “full glass coverage” or a “zero-deductible glass option.” This means my deductible is waived specifically for windshield repairs and replacements, and my insurance covers the entire cost. I’ve had this option on my policy at times, and it offers incredible peace of mind. It’s always worth checking with your insurance provider to see if this is an option for you, as it can save a lot of money in the long run. Sometimes, adding this rider to your policy is surprisingly affordable.
Impact on Premiums
One common concern I’ve had is whether filing a glass claim will increase my insurance premiums. Generally, windshield-only claims under comprehensive coverage are considered “no-fault” incidents and are less likely to impact your premiums than a collision claim. However, consistently filing multiple claims in a short period could potentially lead to higher premiums or a non-renewal, but this is rare for minor glass damage. I always discuss this with my insurance agent when a repair or replacement is needed to understand the specific implications for my policy.
Tips for Saving Money on Windshield Repairs
I’ve developed a few strategies over the years to minimize the financial impact of windshield issues. These have served me well and can help others too.
Act Quickly
This is perhaps the most critical advice I can give. A small chip often can be repaired. A small chip left unattended, especially through temperature fluctuations or hitting a pothole, has a high probability of turning into a large crack that necessitates a full replacement. I’ve learned this the hard way more than once. The moment I see damage, I make an appointment. An ounce of prevention (or in this case, quick repair) is worth a pound of cure.
Get Multiple Quotes
As I mentioned before, comparing prices is key. I never settle for the first quote I receive. I call around to at least two or three different reputable repair shops, including independent ones and national chains. Sometimes, the difference can be significant, especially for replacements. I make sure to ask if they use OEM or aftermarket glass, and if recalibration is included in the price for ADAS-equipped vehicles.
Check Your Insurance Policy
Before I even think about calling repair shops, I pull out my insurance card and policy details. I call my insurance company to understand my coverage, my deductible, and if I have any specific glass benefits. They can often recommend preferred repair shops that work directly with them, simplifying the process and potentially lowering my out-of-pocket costs.
Consider DIY Repair Kits (With Caution)
For very small, superficial chips (often called a “bullseye” or “star break”), I’ve occasionally considered DIY repair kits. These are generally inexpensive, ranging from $10 to $20. However, I approach these with extreme caution. My personal experience, and the advice of many professionals, is that they are best for very minor damage and can be tricky to get right. A poorly executed DIY repair can sometimes make the damage worse or hinder a professional repair later. I only use them as a very last resort if I can’t get to a professional immediately, and the damage is truly minor. For anything more than a tiny surface chip, I leave it to the professionals.
Be Mindful of Promotional Offers
I sometimes see repair shops offering discounts or coupons for windshield repairs. These can be a good way to save a few dollars, but I always make sure the shop is reputable and the offer doesn’t compromise the quality of the repair. A cheap repair that fails quickly isn’t a saving at all.
What to Expect During the Repair Process
Having gone through this process multiple times, I know what to anticipate, which helps alleviate any anxiety.
For Chip/Small Crack Repair
When I bring my car in for a chip or small crack, the process is generally quick and straightforward.
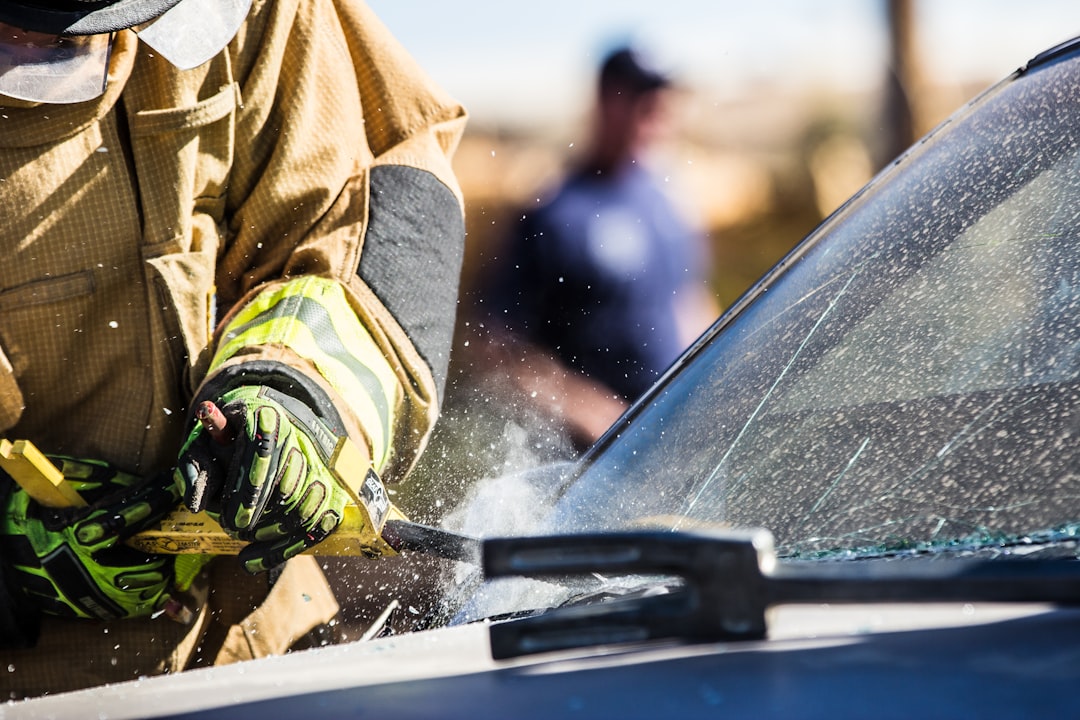
Assessment and Preparation
The technician will first assess the damage to confirm it’s repairable. They’ll clean the area thoroughly, sometimes using a small drill to clear out any debris and create a clean channel for the resin. I’ve found that a good repair technician takes their time with this initial step, as it’s crucial for the bond.
Resin Injection and Curing
Next, they’ll use a specialized tool to inject a clear, optically matched resin into the damaged area. This resin fills the voids and bonds with the glass, preventing the damage from spreading. Once injected, a UV light is used to cure and harden the resin. This process usually takes about 20-30 minutes.
Finishing Touches
Finally, the technician will scrape off any excess resin and polish the area to restore as much clarity as possible. While the damage won’t completely disappear (I can usually still see a faint outline if I look closely), it becomes much less noticeable and prevents further cracking. I often drive away feeling much safer and less annoyed by the blemish.
For Windshield Replacement
This is a more involved process, and it takes longer.
Removal of the Old Windshield
The technician will carefully remove the wipers, molding, and any attached sensors, then use specialized tools to cut through the adhesive that holds the old windshield in place. This part always makes me a little nervous, but I trust the professionals to do it without damaging the car’s paint or frame.
Preparation of the Frame
Once the old glass is out, the frame where the windshield sits is meticulously cleaned and prepared. Any old adhesive is removed, and a new primer is often applied to ensure a strong bond. This step is critical for preventing leaks and maintaining structural integrity.
Installation of the New Windshield
The new windshield, often pre-fitted with new molding, is then carefully placed onto the frame. A professional-grade automotive adhesive is applied, and the windshield is pressed firmly into place. The technician ensures it’s perfectly aligned.
Curing Time and Reinstallation
The adhesive needs time to cure properly, which is crucial for safety. I’m usually advised to wait anywhere from one to three hours (sometimes even longer, depending on the adhesive and weather conditions) before driving the car. During this time, I’m told to avoid high speeds, car washes, and slamming doors too hard. Finally, any removed sensors, wipers, and moldings are reinstalled. If my car has ADAS, this is also when the cameras and sensors are recalibrated, which often requires a specific driving cycle or specialized equipment.
In conclusion, windshield repair costs are not a one-size-fits-all scenario. My years of driving have taught me that understanding the variables, knowing average price ranges, leveraging insurance, and acting quickly are the best ways to navigate this common automotive headache. By being prepared and informed, I can make the best decisions for my vehicle and my wallet when that inevitable chip or crack appears.